“Well, now there is a very excellent, necessary, and womanly accomplishment that my girl should not be without, for it is a help to rich and poor, and the comfort of families depends upon it. This fine talent is neglected nowadays and considered old-fashioned, which is a sad mistake and one that I don't mean to make in bringing up my girl. It should be part of every girl's education, and I know of a most accomplished lady who will teach you in the best and pleasantest manner."
"Oh, what is it?" cried Rose eagerly, charmed to be met in this helpful and cordial way.
"Housekeeping!"
"Is that an accomplsihment?" asked Rose, while her face fell, for she had indulged in all sorts of vague, delightful daydreams.”
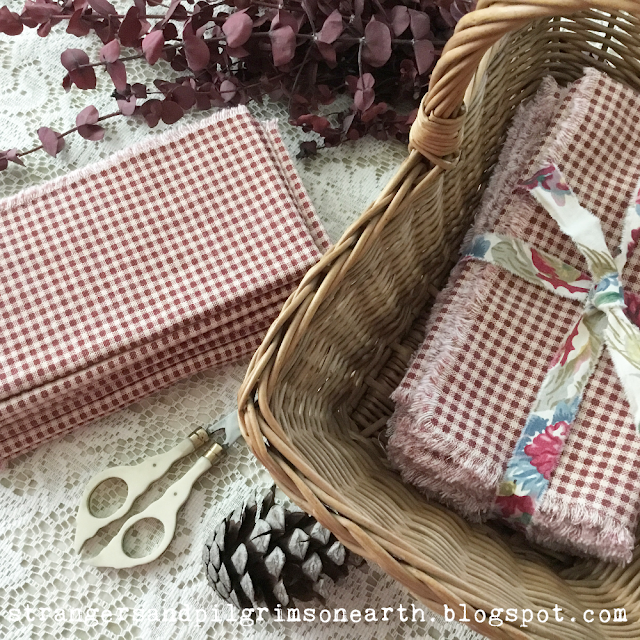
Yes indeed, dear Rose, it is a delightful accomplishment! To run a home of your own using all the order and loveliness you can muster up is a fulfilling and nurturing existence. And even the daily rituals of kitchen-linen-keeping can become beautiful if we put our heart into it. For instance, I haven't purchased paper towels or napkins for our home in over 10 years. One reason I enjoy it is because I love the pretty fabrics I get to work with each day. It brings such delight! This has also been an economical blessing and I see the beauty in that! Because of my enthusiasm, I often get asked about the washing of kitchen linens and my laundry process in general. I think that an efficient laundry system is what keeps this happening in our home and I'm happy to share some methods I have implemented along the way to make this possible.
There are two important factors that make it work for me.
One is having a decent inventory of linens (don't worry, this can be done very frugally!) and the second is having a designated kitchen laundry "outpost". Both of these concepts are key and I'll go into all the nitty-gritty details for all of you detail-loving homemakers out there who share the same interests in daily homemaking routines. There are more of us out there than we realize ;)
First off, to make this run smoothly, it helps to build up a generous supply of cloth napkins.
It works best with pretty ones since you won't mind washing and folding them! But of course, that it entirely my preference. But by having a nice surplus of napkins, you will eliminate the need to wash so frequently which gives you freedom to use real linens in your home. It will remove the stress that you haven't washed a fresh batch quick enough to keep up! It basically allows for more "grace" in your laundering routine. We don't have to worry about having enough table linens when there is plenty of stock to rotate. If you are going to start a system, I recommend having at least 3 - 4 sets to start with. A decent inventory is key to success! And this can be achieved simply and frugally in a manner of ways.
Frugal ideas to build up your napkin supply:
1. Make your own.
You can achieve this by cutting down old sheets and/or tablecloths which don't fit any tables (or which never get used). You can use my
No-Sew "Snip & Rip" process and have a set of 12 in less than 30 minutes!

I like to make them to match each season and by doing this, it keeps it interesting for the homemaker. You get to see different patterns at different times which adds a bit of delight to the laundry pile. But of course, this is not necessary! I only began doing this when I realized how easy it was to fabricate a napkin with just a
snip of the scissors.

Of course, if you are handy with a sewing machine, you can purchase inexpensive sheets with pretty prints and sew them into napkins. Or, you can even thrift pretty linens and turn them into napkins. I have found beautiful floral (Ralph Lauren) bedding for $1-2 at a second-hand store that I had such plans for (but to be honest, I ended up just
snipping and ripping those too! Pictured above). Many people donate odd and end bedding and these would make fine table linens (just place thrifted fabric in the dryer on high heat for 20 minutes to sanitize them -- before putting in your washer -- and then launder the linens in hot water, followed with a nice strong
vinegar rinse)! I received these instructions to sanitize linens from an exterminator (interesting but beneficial source, right?) and I so appreciate these handy tips!
2. Buy a set of cloth napkins each time you would normally buy a set of disposable napkins.
Every time you would usually buy the $20 dollar pack of paper towels, invest in a set of napkins instead. They are very affordable at discount stores (Marshall's, Ross, TJ Maxx, Home Goods) and completely inexpensive at thrifts stores. Continue to do this each time you would need to buy more napkins/paper towels and eventually you will have a good supply of inventory. The buying will eventually stop and the money saving will begin! It is much funner (and economical) to purchase a pretty set of napkins for the price of a warehouse bulk purchase of napkins. Every year I would splurge on an attractive set of 12 (which costs around $12-15) and they ended up paying for themselves in the next few months. Not only is your table more of a joy to set, the grocery bill is lowered and good stewardship is being practiced.
3. Use what you have.
My guess is that you probably have a stash of napkins somewhere. Perhaps they were grandmothers or set aside for special holidays and so forth. Either case you have them and are not using them in any way. Perhaps it is time to bring them out, allow them to get used (even stained!) because what is the purpose of their existence if it isn't to be of service? Start using these sets and slowly add to your collection from the ways shared above. Then, when you have enough accumulated, you can safely remove these from the rotation should you want to preserve them for some reason.
Be practical:
Overall, when choosing fabrics or buying napkins, it is best to utilize dark or patterned napkins so that obvious staining won't be a hindrance in this routine (especially with younger children, more on this later). Even solid napkins can be a problem if you are concerned about stains (the busier the fabric, the more stain-camouflaged they will be).

Convenient Location is Key:
In order to make the napkins convenient to use, I found it helps if they are visible. This is also good for when you have guests. They will look around for a paper towel and napkin and when they see the basket, they realize this is what they should use. We now keep our napkins in a wicker basket on our table. In our other home, we kept them on the lowest shelf of our baker's rack. Either way, this makes for easy access when setting the table and is convenient when putting fresh linens away. Because I have so many, I also have a few baskets scattered in the kitchen dining area that are filled with my surplus of napkins. This is not only for convenience but it is also a pretty but practical decoration.
On ironing and wrinkles:
If I line dry our linens and clothespin them firmly, corner to corner, they dry nice and smooth. In the dryer, if you fold them immediately while hot, they fold up beautiful. There are a few thicker fabrics that crinkle at the corners which can be frustrating but the ones I make (no sew) with light cotton sheets launder well and fold wonderful!
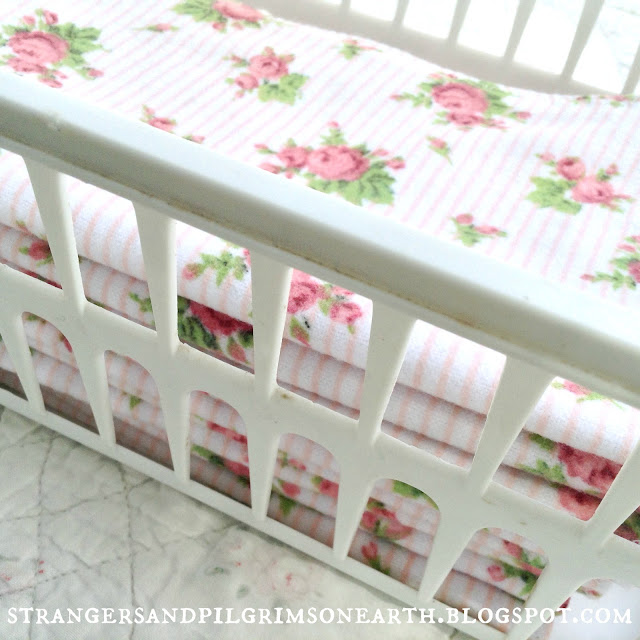
Additional linens to have on hand -
Reusable Paper Towels:
While napkins are obviously helpful for meals, the paper towel can be re-created into un-paper towels. Once again, one less thing to buy! I've been using these for years and love to make them in flannel "double-ply" fabrics as they are quite absorbable and durable. But, you can also just cut up old clothing, bedding, etc., into squares and use that instead. Some ladies purchase inexpensive towels at Dollar Stores and use these happily (and without labor) as paper towel replacements. To make this convenient, place your version of the un-paper towel in a basket somewhere in the kitchen that is readily available. Anytime there is a spill or kitchen mess, simply grab the un-paper towel to mop it all up!
You will find my un-paper towel tutorial
HERE if you would like to sew your own. I have found some delightful floral flannel remnants at second-hand stores that I've turned into lovely un-paper towels for pennies.
Of course, now that I have finished homeschooling, I have a bit more time so I have also made up some seasonal prints of un-paper towels for our kitchen. It's the little things dear homemaker!
Grease has also been brought up with concern in various conversations. When frying tacos, I have used my un-paper towels as absorbable napkins and will give them a light wash under the kitchen sink with dish soap before placing them to dry overnight (prior to adding to laundry pile). But I will be honest, my husband isn't so thrilled with this idea and he purchased one roll of paper towels purely to be used for absorbing grease (he placed them under the kitchen sink so they are not so easy to access). I have also just used parchment paper to line this type of food but I'll be honest, I don't deep fry too many things. This is an area that you will have to decide what works best for your household as there is no perfect answer (unless you have one?).
Dishcloth DIY:
I also thought to share this little project as it fits into the general theme of the post. You can repurpose worn-out bath towels (or in this case a damaged and vintage, hole-filled terrycloth tablecloth) into cottage-style dish rags. Simple cut out squares of approximately 12" or so (I just used a washcloth as a pattern) of the undamaged areas of the chosen linens. You can either hem the entire cloth (if that is the case you may want to cut out a larger size) or use a bias tape and sew around the perimeter. I used leftover strips of different fabrics from my leftover sewing projects and created my own edging with them. It was fun to make a set of these dishcloths in various designs. Rick-rack edging would also be darling for this! I use the dishcloths (shared above) to wipe and clean our tabletops, countertops and stovetop (basically, the more sanitary cleaning while the un-paper towels deal with the dirty floor messes and spills).

Tablecloth Tips:
Some of us have tables that need covering before setting out meals and/or they like to keep a constant tablecloth on the table for decoration. This is the case for me. And since I don't want to wash a tablecloth for every meal I prepare, I have found some useful products for laundry convenience.
When we had younglings, we always used an oil-cloth tablecloth because of its ultra slick surface (shown above). These make it VERY easy to wipe up spills, protects the wood or painted surface on your table, lessens your laundry load while being pretty at the same time (you can find them in a variety of prints -- I always loved the vintage floral or checkered designs). You can find beautiful oilcloth patterns at your local fabric store and simply have it cut to size (with no sewing necessary). The best part is that these tablecloths don't require any laundering!
Please keep in mind, there is a difference between an "oilcloth" tablecloth and a "vinyl" tablecloth (which are often found at discount stores a-plenty). While the vinyl tablecloths (pictured above) are less expensive, they can be frustrating to maintain. Because of their flannel-backing, they can get slippery when wiping and are less sturdy than a traditional oilcloth tablecloth. Of course, either will do for the purpose of reducing laundry but I prefer the traditional oilcloth as it is much more durable and user-friendly. It is definitely worth the extra investment because the oilcloth can hold up for years with proper care and they wipe clean with ease (and don't have the frustrating "move everywhere" effect). But I won't pretend I haven't got lured into buying the vinyl when they have cute patterns!

Now that our family is older, I prefer using the "laminated cotton" tablecloths (pictured above). These too are wipeable and can be used all week long if maintained properly. I just wipe the crumbs off the table each evening and then spray any stains with my all-purpose cleaner and it is as good as new! The laminated cotton tablecloths appear more like a "normal" cotton cloth which is lovely (but they are dipped in some kind of laminate). However, they would be a bit harder to maintain with toddlers as the surface isn't as slick and would require "spot" cleaning (unlike oilcloth which wipes away in a swipe of the rag!). Also, the "laminated tablecloths" need to be laundered every week to keep them fresh while the oilcloth does not.

Sponge $avings and other Washing Sentiments:
Regarding the dish-washing system, I personally use a sponge (cut-in-half to extend the life of the sponge) to wash all my pots and pans. The sponges can be placed in the dishwasher to sterilize them as necessary (if you don't have a dishwasher, it can be washed in the washing machine with your normal kitchen linens).
I use my dishcloths to wipe/clean our tabletops, countertops and stovetop. I end up changing out my dishcloth every day or so depending on the work it has done in a day. I don't use my dishcloths or kitchen sponges to wipe up spills on the floor, etc. (as that would contaminate it for the surface cleaning I do in the kitchen).
I use the un-paper towels for more of the "dirty work" in the kitchen.
The "Kitchen Linen Laundry Basket" is a Beautiful Tool:
And finally, the most important aspect of this system for me (besides the abundance of napkins) has been the "kitchen linen laundry basket" (aka the designated kitchen laundry "outpost"). I keep this hamper right near the kitchen so that as soon as we clear the table, the soiled linens get tossed inside. It is also the convenient place to throw in your dirty dish towels and kitchen rags (and tablecloths if you are using). Once this hamper is full, I know it is time to put in a load of wash! For our smaller household it is only necessary to wash once a week but larger households may have to wash twice a week. Children can be in charge of folding the linens as they are so easy and this makes it super simple for dear mother. It is important to note that no other laundry gets placed in this. You want to keep it kitchen oriented so that you have control of seeing when it is time to wash your table linens AND that you can easily place everything inside your washer without needing to sort through anything. Plus, you will be treating these linens a bit different in the washing machine which makes even more sense to keep them all together.
I have no issues with mold when I place damp kitchen towels inside since I wash these once a week and it is "airy" in a hamper. However, with dishcloths that are completely wet, I leave them overnight on the sink to dry a bit better before adding to the hamper.
I have seen some darling hampers at thrift stores inexpensively. It kills me to not buy them all and bring them home! Perhaps you can rescue one for me for this little household project?!
Washing the Linens:
Doing a large load using hot water (which I personally like to use for table linens) costs approximately $1 per load (according to some quick Google searches) which still makes this a very cost efficient system. Because there is raw meat involved in kitchen work and a plethora of spices, oils and smears (I'll stop here), I like to sanitize my kitchen linens a bit more than my normal wash loads. Once every two months, once the laundry agitates and the soap is in, I'll add some baking soda, or borax (or Oxy-Clean if it really needs it) and let the wash agitate a minute more and then stop the washer and let the mixture soak overnight. In the morning, I will press start and finish the wash cycle.
On a daily basis, I will use my
lemon infused vinegar as a fabric softener to freshen things up. When I run out of my infused vinegar, I will add a scoop of baking soda to the loads for extra cleaning power. I will be honest, I do not individually treat each napkin for stains. I NEVER DO (and my napkins always "appear clean"). That would make this concept too burdensome! I strategically choose fabrics that are printed enough that a little stain here or there won't harm the overall appearance. A set of plain white napkins, for instance, would not be used on my daily dinner table (that is something I would reserve for special events). Once again, a dark or patterned napkin is the ideal choice.
EXTRA FRUGAL SUGGESTIONS --
There are years we had to live quite
lean and I had to utilize some of these concepts below. Perhaps you are at this point in your life? If so, these ideas may be helpful for you. Any sacrifice you make to stay home is worth it dear ladies!
Ideas to Reduce Wash Loads:
If constant washing of linens is a concern, consider utilizing the Victorian Era technique of using individual napkin rings. Each person should have something to distinguish theirs from all the rest (perhaps a different color per person or another form of identification) so that each person can reuse their own napkin for all the meals in a day (the Victorians would make it stretch until wash day attempting to change them at least 2 - 3 times per week). Though modern day napkin rings are more for show, you can see there was once a purpose beyond a beautiful display and that was the beauty of less laundry!
Another idea I learned from this
frugal living book was to invert your "used" napkin for the next meal so that you have a clean surface to start with. If you are really thrifty, you can get away with folding one way, then the other way for the next meal and then finally place the napkin inside out. I personally wouldn't recommend going that far if you are serving sticky meals such as ribs or any other greasy food which would be less than desirable to reuse (but I definitely have done the inside out method to stretch it one more meal when
times where tight!).

Ways to Save Even More Money:
For extra savings, consider hanging out your lovely linens to dry instead of using a dryer. They look so beautiful flying on the line and there are many
benefits to using a clothesline. Just don't leave them out all day when very hot and sunny because the sun does bleach (which is good to some extent because it disinfects your linens)! But it may also fade your linens if you keep them out all day.
And lastly dear reader, my constant reminder here on this little blog... It is not about whether or not you use cloth napkins or in the end, if you use disposable paper napkins! The most important part is that you are preparing a table for your loved ones each night, not only nourishing them with food, but with precious prayers and family fellowship. The "breaking of bread" together in the home was a significant part of the Lord's ministry and should be just as important in the ministry to your family as "keeper of the home".
"And he took bread, and gave thanks, and brake it, and gave unto them, saying,
This is my body which is given for you: this do in remembrance of me."
~ Luke 22:19
And they devoted themselves to the apostles' teaching and the fellowship,
to the breaking of bread and the prayers."
~ Acts 2:42 (ESV)
"Wisdom has built her house...
she has also furnished her table...."
~ Excerpts from Proverbs 9:1-2
Have a beautiful day and please feel free to share your frugal, kitchen linen laundry system in the comments! It is fun to learn from one another and these kinds of homemaking tips are always appreciated!