Friday, January 29, 2016

Peanut Butter Chocolate Chunk Muffins {Grain Free} ~ Printable Recipe


"With such rivals for the notice of the fair as Mr. Wickham and the officers, Mr. Collins seemed to sink into insignificance... but he had still at intervals a kind listener in Mrs. Phillips, and was by her watchfulness, most abundantly supplied with coffee and muffin."
~ Jane Austen, Pride & Prejudice

I never thought I would ever be sharing a grain-free muffin recipe. But with all these new allergies that are presenting themselves, we have done a lot of experimenting in the kitchen lately! These muffins are a nice, satisfying sweet snack, without giving you that heavy feeling. Perhaps you are searching for new ways to eat and could use a recipe like this also?


They may even be acceptable for breakfast with a large glass of cold, raw milk.  They are quite low in sugar too. Just 1/4 of a cup for 16 muffins! The banana puree helps out with the sweetening.


Ingredients ~
  • 2 cups peanut butter
  • heaping 1 cup mashed bananas (overripe preferred)
  • 4 eggs
  • 4 tsp. vanilla extract
  • ½ tsp. sea salt
  • ¼ cup raw sugar
  • 1 tsp. baking soda
  • 2 tsp. apple cider vinegar
  • 2/3 cup dark chocolate chunks, plus some extra if you like

To Make ~

Preheat oven to 350 degrees. Line 16 muffin cups with cupcake liners.

Put the peanut butter, bananas, eggs, vanilla extract, sea salt, and raw sugar in a food processor. Place the baking soda on the top and pour the apple cider vinegar on top of it to create a chemical fizz reaction. Next, puree until smooth and creamy. Lastly, add the dark chocolate chunks. Using a spoon – not the food processor – mix the chunks into the batter. Fill the cupcake liners up nearly to the brim with mixture; there should be the 16 muffins in total. If desired, add some extra dark chocolate chunks on top of each muffin. Bake for 17 – 20 minutes, until puffy, and until a toothpick inserted comes out clean. If the toothpick penetrates chocolate, select a different spot.

Note: These muffins freeze well.


I invite you to a plate and a butter-knife and a large slab of creamy butter! You are also welcome to the printable recipe which is shared here

Wednesday, January 27, 2016

Make Your Own Healthy Smoothie Station ~ Printable Labels


"I can recollect nothing more to say at present;
perhaps breakfast may assist my ideas..."
~ Jane Austen {in a Letter}

If you haven't realized this yet, everything becomes a celebration in the home when you enjoy being a keeper of the home. Things like making a simple breakfast is taken to the next level by one simple change. For instance, when my mother gifted us with a wonderful Nutribullet blender, our whole family had a renewed excitement toward our morning smoothies. The next thing you know, our extra jars were brought out, a special area was created and a smoothie station was born! My husband walked by laughing and said he was surprised I didn't label the jars. I just smiled as I was proud that he understood me, but also because he didn't give me enough credit. They were sitting in the printer tray.


The reasons we like smoothies for breakfast is, less mess in the morning, less thinking on what to make (and we are able to begin our homeschool schedule on time), they are a simple way to include all those nutrients (and raw foods) that we may be lacking in our "normal" meals (more on this later) and finally, they are just plain tasty!


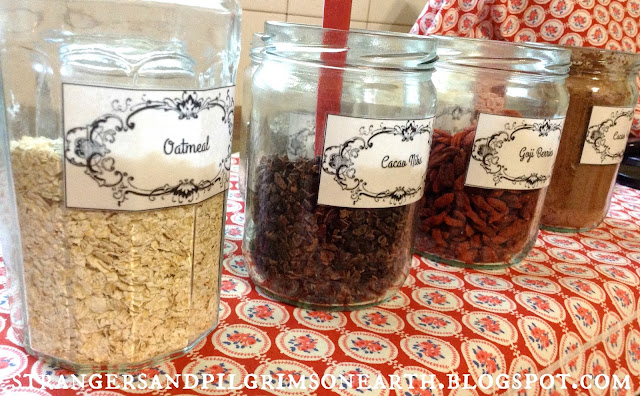
Here is a quick summary for those that are new to healthy, morning smoothies:

~ Start with a liquid "base" of choice such as raw milk, coconut milk, coconut water, yogurt or kefir.

~ Add in some frozen fruit such as strawberries, blueberries, pineapple, raspberries, peaches, bananas, etc. (basically any fruit that your family enjoys). We flash freeze these fruits individually on cookie sheets and dump them into containers when they are in season but you can also purchase them frozen for convenience year round. I would encourage you to make it a point to freeze a tray of banana chunks each week. They are really helpful to improve favor and keep you full. They also give a real creamy consistency to the smoothie.

~ Add in some vegetables if you like! This is a great way to get down those greens such as a collard greens, kale, spinach and swiss chard!

~ Add in a natural sweetener (if you choose to) like raw honey, maple syrup or half of a banana (which is what we do).


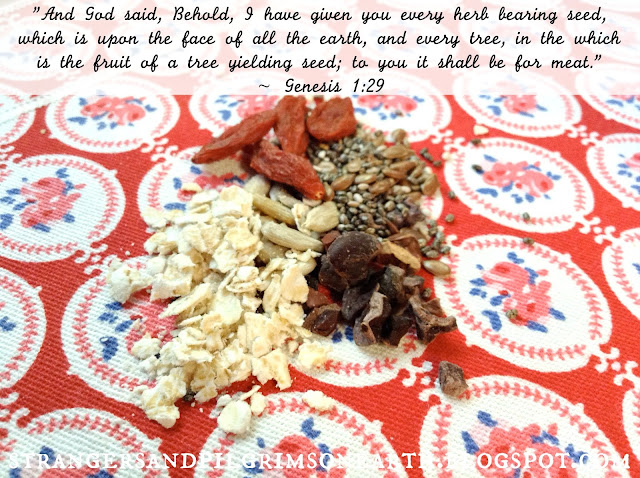
~ And lastly, add in some "boosters"! This is the fun (and ultra health punch) part and where our labels come in! I will share some benefits for each of these ingredients and you can use what would be helpful for your family members. We end up putting in approx. 1/4 of a cup worth of "boosters" in one tall 16 oz. glass. Some options are:


  • almonds ~ rich in monounsaturated fats (reduces risk of heart disease), magnesium and potassium.
  • cocoa nibs ~ (this is the raw cocoa bean, unprocessed and without sugar) rich in magnesium, antioxidants, brain stimulating chemicals, helps body absorb calcium, fight disease, stabilize moods. Cacoa is high in magnesium (I once read that 80% of children are magnesium deficient. What is interesting is that a lack of it can hinder concentration and focus (think "ADD" here...). Once I began supplementing magnesium in our diets many moons ago, I noticed the attention span in our homeschool increased!) Also helpful for restless legs, and much, much more!
  • cocoa powder ~ (this is the real cocoa bean powered, unprocessed and without sugar) same as above.
  • cashews ~ rich in monounsaturated fats (reduces risk of heart disease). Contains 31% of the daily recommended value for copper, along with 23% for manganese, 20% for magnesium and 17% for phosphorus, add to that 12% of the daily recommended value for vitamin K (source).
  • chia seeds ~ high in omega-3 and omega-6 fatty acids, good source of iron, calcium, zinc, high fiber content which helps stabilize blood sugar levels. Think of chia and flax as brain food. Many children are not getting these important omega's because of the unhealthy fast food lifestyle and this can affect brain development! Adding a few teaspoons in your children's (and your) smoothies will be such a blessing! 
  • flax seeds ~ omega-3 fatty acids, dietary fiber, lowers cholesterol and strengthens the bones.
  • goji berries ~ contains 21 trace minerals, 18 amino acids and richest known food source of carotenoids, rich source of vitamin C, is said to slow the aging process (not sure how that works though!), boosts brain cell counts, vitamin A which boosts immune response and eye health, prevents heart disease. 
  • green powder ~ (food supplements made from a combination of vegetable "greens") rich in vitamins, high in antioxidants, minerals including potassium, calcium and magnesium and other plant nutrients that can help promote overall good health and prevent cancer (source).
  • maca powder ~ contains 8 of the 9 essential amino acids, fiber, vitamins E and C, calcium, potassium, iron, immune boosting compounds, energy boosting and libido enhancing. Used for “tired blood” (anemia); chronic fatigue syndrome (CFS); and enhancing energy, stamina, athletic performance, memory, and fertility. Women use maca for female hormone imbalance, menstrual problems, and symptoms of menopause (source).
  • oatmeal ~ high in fiber (makes you feel full so good addition for those who desire weight loss), lowers heart disease risk and LDL cholesterol.
  • pumpkin seeds ~ lowers LDL cholesterol, strengthens bones and immune system, decreases the risk of certain cancers, high zinc content (great for men as it helps prevent prostate cancer), great source of protein and iron.
  • sesame seeds ~ lowers LDL cholesterol,  prevents high blood pressure, protects body from liver damage, good source of calcium, anti-inflammatory properties.
  • sunflower seeds ~ lowers LDL cholesterol, contains vitamin E (which prevents heart disease, relieves arthritis and asthma symptons), selenium which activates the DNA repair in damaged cells, kills cancer cells and detoxifies the liver.

There are so many options with these nutritional ingredients. I encourage you to be creative at your smoothie station! If you are interested in using our "booster" labels, you will find the printable HERE. I have found it helpful to cover the label with a piece of packing tape or clear contact paper to keep them in nice condition. There are also some blank labels for you to fill in your own foods.


"The kitchen (that is, your stomach) being out of order, the garret (the head) cannot be right, and every room in the house becomes affected. Remedy the evil in the kitchen, and all will be right in parlor and chamber. If you put improper food into the stomach, you play the mischief with it, and with the whole machine besides."
~ John Abernethy (1764-1831)

We have attempted to "jump start" the new year with a few health inspired posts this month. I hope they were helpful for those of you whose desire is to apply the golden concept of "prevention" in their lives. 

For Further Reading:

This post may be shared with some or all of the following link-ups: The Art of Home-Making MondaysModest Mom Monday'sMonday's MusingsMake Your Home Sing MondayGood Morning Mondays,  The ScoopTitus 2sdaysTitus 2 TuesdaysRoses of InspirationTuesdays with a TwistRaising HomemakersWise Woman Link UpHomestead Blog Hop Wow Us Wednesdays,  Coffee and ConversationHomemaking ThursdaysHome Sweet HomeOur Simple HomesteadFrom the Farm Blog HopFront Porch Friday Blog HopAwesome Life Friday Link UpFive Star Frou Frou FridaySimply Natural Saturdays and Clever Chicks Blog Hop. Thank you lovely ladies for hosting these. Note: Some of the nutritional information was gleaned from the Nutribullet pocket guide.

Disclaimer: I am not a doctor. While I do seek scientific confirmation of the safety and effectiveness of the herbs and remedies I use, remember that using remedies is a personal decision. Nothing I say on this blog is approved by the FDA or intended to diagnose, treat or prevent disease. All things on this blog are my opinion or the opinion of others. Also, if you have a medical condition, are taking pharmaceutical drugs, or are pregnant, please consult your physician prior to taking herbs.

Thursday, January 21, 2016

How to Make an Herbal Liquid Multi-Vitamin Tincture {DIY}


"And there are cases, when, according to the views of the most distinguished and competent practitioners, physicians themselves are much too free in using medicines, instead of adopting preventive measures."
~ Catharine Esther Beecher, A Treatise on Domestic Economy, 1845

A more healthier, herbalier new year! I am not sure if herbalier is a word but felt it should be. As I had mentioned in earlier writings, I like the idea of herbs and foods being the source of vitamins and minerals for our bodies instead of relying on synthetic pills (isn't this the way God originally intended it?). While I do try and drink my homemaker's tea for the nourishment it provides, sometimes, as a busy homemaker, homeschooler and homesteader, there is just no time for tea! This is when a few dropperfuls of a liquid herbal vitamin would come to the rescue! We will try and simplify the process for you here (and it is simple!).


The first thing you will need to do is choose your herbs. We ended up preparing a women's multi-vitamin blend and a children's blend of herbal multi-vitamins. Each of us have different needs in certain areas and the same needs in others. I am including the recipe I used for the woman's vitamin mix and you can alter it according to your purposes. I am also including a link to the recipe I used for the children's vitamins (which the website has since deleted unfortunately!). These glycerin based tinctures are infused inside a warm crock pot so I encourage you to make as many jars as will fit in order to make it productive. We were able to fit four quart jars in ours so we prepared two jars of each. Make sure to label them so you do not get confused if you do two different kinds at once.


Naturally, the rose hip (our current highlighted herb), full of vitamin-C is one of the base ingredients in both of these herbal vitamins. To make it easy, I used the nutritive blend of herbs from our homemaker's tea as the base for this recipe and then added additional herbs that I felt would be personally useful for the properties they contain. However, I encourage you to do your own research and add your own customized herbs to the "base" (homemaker's tea recipe) that will be beneficial to your health.


Women's Herbal Nourishing Multi-Vitamin Blend
  • 1 c. homemaker's helper herbal tea blend (the nutritive blend shared here) *
  • 2. tbsp. rose hips (for the vitamin C, etc.)
  • 2 tbsp. alfalfa leaf (for the iron, 8 essential amino acids, chlorophyll, vitamin A and K, etc.)
  • 2. tbsp. ginkgo biloba (for the memory help, anti-aging benefits, etc.)
  • 2 tbsp. dandelion (leaf and root) (for the blood purifying benefits, liver cleansing, calcium, etc.)
Children's Herbal Multi-Vitamin Blend
  • The herb combination I used for the children's vitamin blend is no longer on the website I used (but shares some of the same herbs I listed for us women). You can prepare this tincture the same way we do with the women's blend but use a different dosage for the administration.
* Note: If you already have the ingredients for the homemaker's tea blend and can't afford additional herbs right now, you can always use 1 1/2 cups of the blend for a wonderful women's nutritive vitamin. Or, if you have everything but a few herbs, just skip them this time if your budget prohibits it, something is better than nothing!


To begin, add chosen herbs to your clean quart jars. Do not pack down the herbs and do not exceed the half-way point on the jar. We need to make sure there is plenty of room for the right proportion of glycerin to "preserve" the tincture with a 2 year shelf life. Pour hot water over herbs until just damp (and trying again to not exceed the half-way point on the jar). Let this mixture sit for 30 minutes to break down the herbs.


When time has elapsed, fill up the remaining of each jar with food-grade glycerin (leaving 1 inch head space from the top). Cap jars and shake until well blended.


Place an old wash-cloth or rag at the bottom of your slow cooker to line it so the jars do not break. Place jars inside and add just enough water to cover the jars about ¾ of the way up (making sure the water does not cover the lids). Place cover on your slow cooker and put it on the warmest setting for 3 days. I have a "warm setting" on my crock pot that I used.  Also, our lid did not fit completely over the jars, there was a little gap as the jars were a bit tall for the crock pot but it didn't hinder the process at all. One last thing is to keep an eye on the water level in the next 3 days in the slow cooker to see if it requires a bit of a refill to maintain the proper level.


When the 3 days are complete and the liquid has cooled, simply strain your tinctures through a sieve/strainer lined with a clean lightweight dish towel or cloth. You will want to squeeze out every last nourishing drop! Make sure you label your multi-vitamin tincture with the contents and date. It should last for 2-3 years in your pantry. The suggested dose for the women's multi-vitamin would be approx. 1 tbsp., 1-3 times a day while the author of the children's tincture shares the dosage on her tutorial.


Lastly, please understand, I am not saying that all your vitamin and mineral needs are met for the day when using this herbal liquid. It is simply an all natural supplement to the vitamin-filled food we should already be eating. And it is a less expensive way to nourish your family as quality herbal whole-foods vitamins come with a large price tag! Although the initial investment of the herbs may be a bit pricey, they will make many tinctures and teas. To make it more affordable, the Bulk Herb Store sells in 1/2 lb. bags.

{For more make-your-own herbal recipes, please visit our Home Apothecary Series.}
For further reading and some of my sources of information, visit:
Herbal Vitamin and Mineral Tincture by Keepers of the Home
Liquid Multi-Vitamin Tincture by Wellness Mama
Children's Multi-Vitamin Tincture by Bulk Herb Store (NO LONGER ON WEBSITE)

Disclaimer #1: I am not a certified herbalist but a homemaker interested in the arts of natural healing. The information I have learned has been gleaned through study of some of the following favorite books; Rosemary Gladstar's Medicinal Herbs: A Beginner's GuideHerbal Recipes for Vibrant HealthGrow Your Own Drugs by James Wong, and The Complete Illustrated Book of Herbs by Reader's Digest and websites of herbalists (such as the Bulk Herb Store Blog).

Disclaimer #2: I am not a doctor. While I do seek scientific confirmation of the safety and effectiveness of the herbs and remedies I use, remember that using remedies is a personal decision. Nothing I say on this blog is approved by the FDA or intended to diagnose, treat or prevent disease. All things on this blog are my opinion or the opinion of others. Also, if you have a medical condition, are taking pharmaceutical drugs, or are pregnant, please consult your physician prior to taking herbs.


Tuesday, January 19, 2016

Antique Citrus Art Prints {Pottery Barn Look-Alikes} ~ Free Printable Set


Ah... to appreciate the lovely things at the expensive stores when your budget is that of a farmer. Why does one even look you may ask? In this case, it is to get ideas... as those are free my friends! :)

Photo Source: Pottery Barn

Pottery Barn sold these prints a few seasons ago and I fell in love with them. First off, you can see I have become a bit addicted to citrus ever since I started the citrus series for the winter months. Secondly, I just thought they were a really neat and unique antique design. As they no longer sell these prints, I have attempted to create something similar.

Photo Source: Pottery Barn


They aren't exactly the same. It is just the idea that is there. Our encyclopedia background is circa 1911 with an antique colored background (shown below) while the original is white (shown above). We also used more of a scientific botanical print from the Victorian Era which shows the detailed plant parts. 

A Sample of Our Version

"Creativity is a part of personality. Surely the place where you as a personality live should speak of your creativity in some way."
~ Edith Schaeffer, The Hidden Art of Home-Making 

We are offering our version to any who are interested. If you print them out in their original 8 1/2 by 11 size on card-stock and frame them, I think they would look lovely in a kitchen. If you were to find a set of frames at a second-hand store and paint them to match your decor, it would make a nice and frugal decoration (notwithstanding the cost of printer ink). I hope you have enjoyed this little homemaking project. Have a lovely week!


For the free downloadable lemon print, visit here and for the orange print, visit here. There should be a printer icon at the top of the page which you can use to print instantly. I have tried using Google docs for my downloads this time in hopes that it will be more user-friendly. Please (pretty please!) let me know if this is a better and/or easier "printable" option (even if only for the sake of experiment and even if you don't print it, do you think you will be able to access it easier?)! Thank you so much in advance for the feedback!


Friday, January 15, 2016

Preparing a Proverbs 31 Pantry ~ A Happy Homemaking Hobby


"The little house was fairly bursting with good food stored away for the long winter. The pantry and the shed and the cellar were full, and so was the attic."
~ Laura Ingalls Wilder, Little House in the Big Woods

Provision, prudence, planning and preparation are all wonderful words that can describe our excellent example of the virtuous woman. If she was to have a pastime, in my imagination, it would be that of keeping a well-stocked pantry. A Proverbs 31 pantry, if you will. It is quite the happy homemaking hobby and has been practiced by necessity for hundreds of years by our pioneering foremothers. If that alone isn't convincing enough, I invite you to visit here for 10 modern-day reasons to prepare a pantry. But despite the many advantages, I simply wanted to share how the pantry has become an enjoyable but practical amusement for me. Please visit our guest post today at Raising Homemakers for the remaining article (I would love for you to leave a little note there to let me know you "dropped by"!). Happy homemaking, ladies!

Wednesday, January 13, 2016

What to Make and Do with Oranges ~ Citrus Series


"The Orange.— It is supposed to be indigenous to Central and Eastern Asia. Whatever its nativity, it has now spread over all the warmer regions of the earth. The orange tree is very hardy in its own habitat, and is one of the most prolific of all fruit-bearing trees, a single tree having been known to produce twenty thousand good oranges in a season. Orange trees attain great age. There are those in Italy and Spain which are known to have flourished for six hundred years. Numerous varieties of the orange are grown, and are imported to our markets from every part of the globe. Florida oranges are among the best, and when obtained in their perfection, are the most luscious of all fruits."
~ Mrs. E.E. Kellogg, Science in the Kitchen, 1893 


Make Your Own Orange Peel Granules for the Pantry


DIY Frugal Version ~ On Guard® or Thieves® Protective Oil Blend


DIY Orange Flavored Kombucha

Add freshly squeezed orange juice to your 2nd ferment of kombucha (we do approx. 20% juice per 80% kombucha ratio). You will also have better "fizz" results if you do your second ferment in a snap-lidded bottle (just make sure you "burp" the bottle once or twice a day to avoid bottle explosion from built up carbonation).

Homemaking Hint: It is less expensive to purchase a lemonade in one of these bottles for $3.99 at Cost Plus and then recycle them for all your kombucha ferments. 


If you enjoyed these ideas, you may also be interested in What to Make and Do with Lemons.